Showing posts with label craft: miscellaneous. Show all posts

Saturday, October 10

Congratulations, Mr. and Mrs. Halpert.

Alternately: It's too fun not to be a nerd once in a while.

On Thursday nights, I run to my friend Jess's house right after dinner (although on these nights I usually manage not to eat any) in time for The Office, what will be 30 Rock, and Project Runway. TV night. Nothing else on the agenda. It's great.
We decided to really unleash our pop culture-couch potato-osity this week and join in the celebration with the folks on The Office. No, I don't have pictures of Jim on my desk, I don't have any Office flair on my Facebook account and I don't read The Office blogs. We just happen to enjoy watching it together and thought it would be fun to jazz up our evening.
I made this wedding cake and the clothespin doll cake toppers for the occasion. Jess made punch and our friend Penny wore a bridesmaid dress. (Well, for a few minutes, at least). We had fun.
And, really, when you love to bake you'll make any excuse, right?

Friday, July 24

Alphabet block magnets

I know I promised more food posts this week, and I do have some ready, but I got so distracted with this tutorial and then felt I just had to finish it and post it before doing anything else. Anything else. Like washing dishes or preparing for our blueberry-picking trip or doing laundry or eating lunch. Sometimes projects do that to you, you know?
So here is a tutorial for alphabet block fridge magnets or photo holders.

Materials:
alphabet blocks
small hand saw
small piece of sandpaper
3/4" round flat magnets
drill fitted with 3/4" spade bit
craft glue like E6000
table vise, clamp or some way to stabilize your block while drilling (I stood on the side of a 3" C-clamp)

1. I chose 5 blocks with the initials of our family.
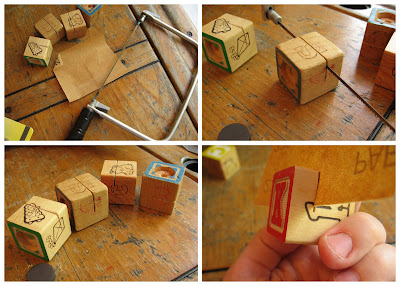
2. I used a coping saw to create a slit in the top of the block. I made it almost halfway between the front and back of the block, but a little closer to the front. I sawed down a little more than halfway to the bottom. Make sure your letter is right side up before sawing!
3. I sanded the inside of the slit and curved the paper to sand the side edges at the cut.

4. I tightened a 3" C-clamp around my block with the front of the block facing the floor and the back of it facing up.
4. I fitted our electric drill with a 3/4" spade bit and centered it on the back of the block (while standing with my feet holding the clamp to the floor).
5. I drilled down about 1/8" and dropped a magnet in to make sure the hole was flat on the bottom and as deep as I wanted. (I wanted to mostly hide the magnet).
6. I used a toothpick to spread some glue in the hole and pressed the magnet in.

Once the glue dries, you can stick your block to the fridge and insert a photo or your appointment reminder card or library due date receipt. If your photo is not secure enough in the slit, then wedge a little piece of paper or cardstock behind it.

Now, to use the blocks as tiny standing photo displays, business card or place card holders, simply cut the slit through the top and skip the rest. Unless you want the block weighted, in which case you could drill through the bottom instead of the back and insert a magnet or something to weigh it down.
Try stacking and gluing the blocks for a little photo tower or build pyramids or what have you. These blocks make it easy to change up your display often!

Monday, December 22

Button wreath ornaments

It's almost Christmas and I figure most of you are probably finished with your holiday projects or out of town away from your computer altogether. Merry Christmas! But, for those of you still hanging around needing something to do with your kids, here you go:
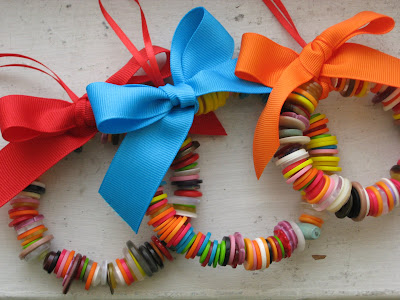
I saw these cute little ornaments last year and filed the idea away for future use. I'm glad I did. These were so simple. Perfect for another one of our afternoons confined to the apartment. The kids enjoyed making them (they strung all their own buttons and chose ribbon), and they look super cute hanging on the tree or just about anywhere. Also a great way to use up old buttons if you have too many ugly buttons hanging around. Of course, if you just have the ugly ones, you may want to get a little pack of holiday or brightly colored buttons to mix in.
See Martha Stewart and Me and My Girl for tutorials and more cute examples.

Wednesday, July 9

Naptime place mat experiment


After seeing the place mats pictured at the top from Publique Living, I decided I needed to immediately try making some of my own. I didn't have sheets of paper or foam bigger than scraps and 8 1/2 x 11, but that's probably best for experimenting, anyway.
We've had ducks on the brain since we've been reading Make Way for Ducklings (and I'm trying to get a craft together for the kids to go along with it), so I guess that's what got me doing ducks here. My drawings and cuts are way less than desirable, but I was rushing to finish while the kids were waking up from naps. I'm satisfied knowing that, if I really wanted to, I could create our own special place mats in this fashion (being more purposeful with the design and execution) for home, parties, or gifts. The foam is especially fun, would be attractive in bright colors, and would be wipeable and reusable.
Try it!

Monday, June 30

Dyed silks


We dyed playsilks a few weeks ago at my parents'. I've been wanting to do this since I saw them here (and then more here). My mom ordered the silks (some 30", some 12") and then I purchased the million packages of Kool-Aid. This was a fun activity and the directions at each of these sites are easy to follow. Now we have a dozen silks for tent-making, dress-up, hairstyling, peek-a-boo, etc., etc. Lots of fun!
The top picture is of our newly dyed silks hanging to dry. The second picture is of the dried silks, sporting a more tie-dyed look since we didn't individually wash the scarves (oops).

Advice: Don't try to dye a dozen silks in one sitting. At least not with small children. It just takes too long. I think 6 would be a lot more doable.
Also, sink or machine wash each scarf individually after dying if you want to avoid the bleeding.

Wednesday, June 18

3 Easy Projects

First of all, here is a simple craft foam project.
Instructions: Cut out shapes. Put shapes in bathtub. Play!
When wet, the foam sticks to the tub walls and other pieces of foam (like the faceless guy with removable clothes up there). Sets of these are sold commercially, but many of the pieces are thick foam which won't stick in the curved part of a bathtub. The thin craft foam will stick on the curve.


Second project. Necklaces.
Instructions: Punch holes in your leftover bits of craft foam (all the funny shapes left behind after cutting your bath toys). Cut some curvy shapes out of empty cereal boxes and punch holes in the center. Cut used (washed) drinking straws into short segments. Assemble these ingredients plus some cheerios and tubular pasta in bowls or a muffin tin. Cut a length of string that will be long enough to pull over your child's head when knotted. Slip on a button and knot the string behind it (to keep the other items from slipping off the end of the necklace.) Wrap a short piece of tape around the opposite end of string to make it easier for slipping through holes and to keep it from unraveling. String items on, knot necklace, trim ends, and wear!

You could use these items for a collage, as well. (Bonus 4th project idea.)

Third project. Travel necklace.
Instructions:
Cut a length of string as before.
Prep ends as before (button on one end, tape on the other.)
Drop in a ziploc bag along with a bunch of cheerios.
Pull out on the plane and your child has an edible activity!

(This project is included in The Preschooler's Busy Book.)
You could always throw in some of those other necklace-making ingredients, as well, but we're taking the easy route when we fly home on Friday.

Thursday, June 12

Metal Tooling and Father's Day: Not For Daddy To Read!

Yesterday we attempted Mexican Metal Tooling. This is a really fun and unique project. I think children older than mine will enjoy it more and could turn out more complicated and colorful designs, but mine did help create this nice little hanging for their daddy's office.
I love the look of the added beads on these other great examples of metal tooling (here at Pepper Paints via The Crafty Crow and here at Kinderart), but we thought it was a little much given the limited display space of a cubicle. Maybe another time.
See those sites for easy-to-follow tutorials for making your own metal art.
Note: We included foil circles created by tracing around a tin can and added the foil banner at the top to customize it for Father's Day. Our subject matter includes meaningful images relating to my children and their personalities or experiences with their dad.

Friday, April 25

Shrinky Dinks


One of my daughter's friends gave her a shrinky dink set for her birthday. We opened it this morning and made bracelets. These are suggested for children over age 7, but with close parental supervision, it worked well. Of course, now the hard job is keeping them away from the baby, but that's a constant challenge when you have two older kids.
My daughter and son both made one bracelet for themselves and one to give away (most likely as a birthday gift to the girls who gave them the shrinky dinks...is that lame?) The set also comes with accessories to create hair clips, cell phone charms, magnets, and necklaces. It's nice to pull a ready-to-go project out of a box once in a while instead of creating, gathering/preparing the supplies myself.
I think it would be fun to create their own shrinky dinks, too, with blank shrinky sheets. Sometime.

Monday, April 14

Stick Puppets


Sigh. Maybe someday I'll teach myself how to arrange photos in some interesting fashion. In the meantime, here's my stick puppet line-up. I mentioned having the idea for these, or what I thought was my idea until I realized I'd seen it on the craft foam package, and now I've finally finished some. The package had a picture of a frog and a fish so my kids requested those (I did stray from their design a bit) and then I decided on the other animals. I'm pretty pleased with myself for the armadillo, I must say. I asked my husband if he thought it was funny or original, but he said, "I don't know, we're from Texas, I just thought it was normal." Oh well.
I used craft foam (5 1/2" x 8 1/2" sheets purchased in a 24-piece package at Target), some hand-drawn patterns on paper (some freehand cutting), craft glue, scissors, a few sequins, and popsicle sticks, in case you're interested. A pretty simple project, overall, but you have to factor in time for the glue to dry. Speaking of which, I'm in the market for a different kind of craft glue. I used Aleene's Clear Gel Tacky Glue, but I'm convinced there must be something faster-setting with a strong bond. Maybe one of these from Beacon? Let me know if you have one you like.
Oh yeah, there's a funny crease in the middle of the octopus I didn't notice until I'd already cut it and then sure didn't want to cut that shape again.

Tuesday, February 12

Valentine Fun and Grover


So, this afternoon we'll be making some Valentine cards with our playgroup. This morning, though, we had the important task of making a cape for Grover. You know, so he could be Super Grover.

Here are some links to fun Valentine crafts, in case you're looking for projects or inspiration:
Chocolate Pretzel Buttons (and other fun ideas) at Craftzine.
Valentine buckets from Kiddley.
Heart-shaped crayons and muffin-cupped crayon cookies.
Felt fortune cookies from Martha Stewart.
Beautiful paper globes by Heather Bailey.
Truffle boxes from A Little Hut.
Place mats, card booklets, wristlets, gift bag, cardholder, Valentine garden...all seen here if you scroll down through recent entries.

(Fortune Cookie photo from Martha Stewart)