Showing posts with label holiday: Christmas. Show all posts

Thursday, February 18

Ornament from the recycle bin

Like most people, we did celebrate Christmas two months ago.
But I didn't blog over the holidays and hate the thought of letting them go by completely unmentioned.

We realized a few years ago that if we want to avoid broken ornaments and the guilt and disappointment that goes along with broken ornaments, we need to stick with the home made variety. Most of our ornaments haven't lasted from one year to the next. I'm totally fine with that. As long as we enjoy making and hanging the ornaments (and hopefully looking at them), I'm satisfied.

This year, my kids ended up using Sculpey clay molded into balls, squares, discs and a lot of free form shapes, pipe cleaners and colored beads for theirs. They turned out pretty cute and weren't demolished during the stay of our tree.
I had been thinking for some time about making trees out of lids from our recycle bin, though, and managed to finish one. I drilled a hole in the center of each lid and strung them together with basic white string. I used a couple Sculpey balls and a disc to create a stronger resemblance to a tree.
So, totally belated, but there it is.

Speaking of belated...O Christmas Tree, O Christmas Tree, You've overstayed your welcome....
Confession: Our (artificial) tree is still piled up on a table in the living room awaiting its return to its box and our basement. This year's ornaments are also still in the living room awaiting their trip back to their dark and creepy home. You know how when you let something go for a while, you start to get used to it being there, even if it's unwelcome?

Tuesday, January 6

Christmas catch-up

I missed out on posting several of our holiday activities while our computer was down (for example, the cookie-a-week I intended to share), but hate to think I completely missed my chance. So bear with me while I indulge myself in a little holiday recap today. And probably again later this week.
From the top:
1) Our decorated holiday sugar cookies. We don't make the cut-out-and-frost variety of cookies very often, so this was a treat for the kids.
2) The paper snowflake I made while visiting with my friend Jess and her blog party guests. Template here in case you're still up for winter decorating.
3) Kids in the snow. I cut out the scarves from solid-color fleece. Talk about a quick and easy project! To personalize, see painting fleece scarves here.
4) Flower decoration made from catalog pages. I love recycled decorating projects! Tutorial here. For other colors and sizes made from copy paper, see here.
5) Lincoln Park Zoolights. Great night out for the kiddos.

You know I just started fiddling with these photo collages-sorry if you need a magnifying glass to make out the images!

Monday, December 22

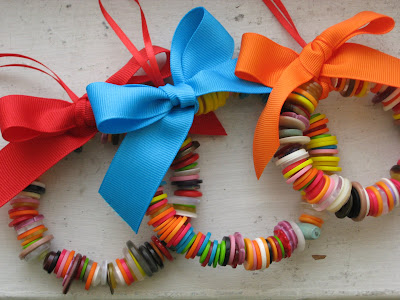
Button wreath ornaments

It's almost Christmas and I figure most of you are probably finished with your holiday projects or out of town away from your computer altogether. Merry Christmas! But, for those of you still hanging around needing something to do with your kids, here you go:
I saw these cute little ornaments last year and filed the idea away for future use. I'm glad I did. These were so simple. Perfect for another one of our afternoons confined to the apartment. The kids enjoyed making them (they strung all their own buttons and chose ribbon), and they look super cute hanging on the tree or just about anywhere. Also a great way to use up old buttons if you have too many ugly buttons hanging around. Of course, if you just have the ugly ones, you may want to get a little pack of holiday or brightly colored buttons to mix in.
See Martha Stewart and Me and My Girl for tutorials and more cute examples.

Wednesday, December 17

Beaded Christmas ornaments

We've been making our own Christmas ornaments again since we're still in that stage where having store-bought ornaments proves a danger to the ornaments and small children. Last year we stuck with paper. Chains, candles, stars. This year, we're stepping it up a notch to include beads, pipe cleaners, buttons, wire. And probably still paper.
Last week, while we were in the beginning stages of illness and confined to our home, we had beaded ornament-making sessions every afternoon. Now that we're still sick, we've moved to buttons, but more on those later. The first picture above includes some ornaments I made, some we made together, and a few the kids made themselves (minus the tying off and making a bow). The second picture is made up primarily of their creations. I hadn't anticipated the kids would be so excited, or at the least satisfied, with merely bending a pipe cleaner and hanging it on the tree. Shows what I know. They're proud of them all and so am I.

Personal Update: Thanks to those of you sticking with me through my sporadic posting. Our computer is still shot. Yes, I'm posting with ESP again. No, not really. I'm using something so old I can't even get the italic function to work. You know we were out of town the entire week of Thanksgiving, came home to a dead computer, all became sick, I spent a long weekend visiting my sister in California (more on that later), came home still sick to a still dead computer, and am now just waiting for our new one to arrive and be installed and whatnot. I really do plan to post more regularly once we have a working computer. Thanks to the new folks who've commented recently. I'll be back. (You can say that like Arnold if you want and I won't think any less of you).

Oh, and by the way, we recently uncovered our baby fingernail clippers, my wedding ring, and our green Thomas the Train wagon. I may have to continue posting my ads publicly if it brings that kind of luck.

Monday, November 24

Embroidered hand prints

I am on my way, right now, to visit family for the week. It will be a fun and busy week, as we'll be celebrating Thanksgiving, early Christmas, and participating in a wedding shower for my sister. Whew.
I'm not very good about getting gifts made ahead of time (or even on time, for that matter), but I did manage to create a keepsake for my parents and grandparents that I am pretty excited about. Simple, but sweet.
I was inspired by this embroidery project at A Number of Things (via Kelly at Almost Frugal-who kindly included my clothespin dolls in her list of handmade holiday gifts).
Alice embroidered the outline of her son's hand which he had traced himself. While my kids aren't really up for that yet, I thought it would be a great way for me to capture their prints. I've never done the traditional plaster prints or even painted ones.
I traced their hands on paper, cut out the shapes, then traced those onto my fabric (you can get fabric transfer paper, but for an outrageous price). Next, I embroidered them all inside a 12" hoop. I kept it simple, with just their initials and the year. I painted the hoops (I didn't have a chance to photograph the other one which is designed a bit differently) so they could be hung as is, keeping enough extra fabric behind that they could be pulled out and framed later, if need be.
My kids were excited to see their hand prints sewn into the fabric and liked the thought that next Christmas they'll be able to put their hands up next to the prints and see how they've grown.
This was my first time to embroider anything. I'm definitely going to do more of it.

Update: I've answered some of your questions about this project and given you some embroidery instruction links here.

Thursday, January 10

I Know it's January

But I have a couple Christmas projects I'd still like to post. These are a few of the very simple holiday aprons (mentioned previously) we made. My daughter chose dishtowels (Target) for each recipient and I trimmed the corners and sewed on the bias tape. I embellished a couple by adding coordinating grosgrain ribbon, but the rest had some sort of character sewn on already and didn't really need any extra.
My daughter chose a towel for me (in addition to herself, her brother, and some extended family), so I dutifully sewed it, wrapped it up and acted surprised when I opened it on Christmas day. I've made my own birthday cake before, but this was the first time making my own Christmas gift. It was more fun for us all to open them and tie them on together.

Monday, January 7

Completed Christmas Placemats


Well, I figured I should present the kids' finished products, since I showed off the little trees and snowmen that went into their work. The pictures are a little dark, but I don't have any photo-enhancing skills. One ended up being unintentionally vertical, but that could be a fun switch, I suppose. We kept the reverse sides very simple (Christmas message with to/from information and pictures of the kids drawing).
We also made t-shirts and aprons this year, which I may post about later. It's taking us a while to get back into the swing of things here after celebrating Christmas away and returning to more winter sickness.

Friday, December 21

Snowmen

Well, not the best picture, but here are some of the faceless snowmen dressed up with arms. You never know which pieces will end up where once the kids have a go at them so I thought I'd take a picture while they have their own matching set of limbs. (Sorry for the nighttime/flash picture!)

Paper Trees

I've just been gathering and cutting supplies for our holiday place mat-making extravaganza and thought the collection of trees looked fun all by itself. I'll have to post our finished products later.

Wednesday, December 19

Holiday Wrap

I was thinking of posting some ideas for holiday gift wrapping, but haven't gotten my act together. Here's just one idea. A sample from last year. This is a felt pocket, basically, with a felt tree sewn on and tiny pompoms glued on top. I didn't have a specific gift in mind when I made it, but it ended up being exactly the size of a DVD. I was inspired by this cute doll wrap, ( which I should try soon, I think my kids would be into it now!) over at Angry Chicken. I meant to make a snowman wrap, too, but never got around to that. Maybe this year. But then again....

Tuesday, December 18

Homemade Gifts By Kids

Some gifts to be made by kids:

Framed art. Let your kids play with paint, markers, colored pencils, crayons, glue sticks, fabric and paper shapes on sturdy paper or posterboard. Take the best bit and pop it into a readymade frame or have a custom frame built for it. Ask them to draw specifically for a relative or take samples of their work and collage it yourself.
Edibles. Any treat that's cut, rolled, dipped, or decorated will be most fun for the kids to make. These shortbread domes are easy and can be color-coordinated for the holidays.
Place mats. We made these for Thanksgiving, but winter-themed mats would be nice for Christmas (that way the recipient can use them after Christmas as well as before). Cut out some trees, snowmen, snowflakes, etc. instead of the turkeys and such for the kids to color and glue. Add photos to really personalize them.
Dough ornaments. Here are some recipes for dough ornaments. You can use Christmas cutters or any that seem appropriate for the person you're gifting. A couple years ago, we made my dad a fish-shaped ornament that was painted like a Christmas tree.
Microwavable salt dough ornament
Multiple recipes for baked dough ornaments
Wreath ornaments. Here is a tutorial for a super cute button wreath ornament.
Painted pots. Buy a set of small ceramic pots and help the kids paint them. Package the appropriate amount of potting soil and seeds (grass is good if any children will be watching it grow) and drop in the pots. Or paint a larger pot and use it to hold an unrelated gift (two gifts in one!) {My children did not paint the pots pictured above, but that was the closest example I had on hand.}
Year in Review Book. Give your faraway grandparents a book chronicling your child's year. "This year, I...." Let your child help choose events she wants to include, drawings, any personal messages. Add cute quotes, check-up stats, etc. See Blurb.com for making your own professional-quality book.

Homemade Gifts For Kids

Some gifts to make for kids:

Felt hand puppets. I found the pattern for this monster in this book (from our library) and then began creating my own patterns. Chicken, cow.... It's really quite simple and very inexpensive, but could be time-consuming depending on how many pieces you put on each puppet. Monster, for example, time-consuming. The cow and chicken were not so bad. (I'd be glad to make and sell some puppets or share a pattern and instructions-if I could figure out how to do so!)
Aprons and cookbook. I will be making some of these dish towel aprons (little sewing required) for our kids and cousins. For our cousins, we're going to include a small collection of kid-friendly recipes we like. If you want to buy a cookbook to accompany the aprons, check out Kitchen For Kids or any other book specifically designed for little chefs.
Custom t-shirts. We bought a couple wee t-shirts and some iron-on transfer paper and will be creating custom shirts with our daughter's face drawing. Take a simple drawing of your child's and surprise them by making it wearable (in the way you want your children to wear their art)!
Custom totebags. Another simple dish towel project here at I Have to Say.... What a great way to make the most of your time and money and end up with a nice gift! Make a tote bag for your child or buy one and customize it with the iron-on transfer.
Edibles. Make these cute lollipop cookies (with the sticks) and package them in clear cellophane bags (try Michael's or any craft store that carries baking supplies) tied off with colorful ribbon for your playgroup friends.
Pillowcases. My kids have been asking for Sesame Street pillows, for some reason, and eventually I'll get around to it. For kids who already have their own normal-sized pillow, here are some tutorials, along with additional ideas for customizing, for pillowcases.
One, Two, Three.
Biographies. Make a book about your child to give your child. Kids love to see pictures and hear stories about themselves. Blurb.com offers a free downloadable program that you can use to create your own book and have published for as little as $12.95 (that's the 7"x7" softcover with 20-40 pages). It's too late this year, but I was thinking a good idea for our daughter would be a little book with 3 short stories in it:
1) Brynnen-pics and thoughts on her life from birth to now.
2) My best friend Kellan-pics and thoughts on her relationship with her brother-how they play and work together, take care of, love and help each other, etc.
3) Mommy and Daddy-pics and info about us from kid-dom to now.

Stay tuned for Homemade Gifts By Kids.

Sunday, December 16

Favorite holiday book

We love this book. This is an Advent book with one uniquely illustrated door to open each day of December up to Christmas. Each door opens to reveal part of the story of Christmas. This would be a great gift to give a family with young children. We've been reading it twice a day (naptime and bedtime) but the kids would read it all day if we let them. Instead, we hide it the rest of the day so they don't look ahead or tear the doors off (they have a tendency to do that).
It's called, simply, The Advent Book, and was written and illustrated by Jack and Kathy Stockman who live in the Chicago suburbs.

Zoolights

We give the Zoolights at Lincoln Park Zoo a thumbs up! We took the kids the other night and they loved it. It was freezing outside, but the indoor animal habitats were open giving us a chance to warm up and watch the animals. We never seem to make it through the entire zoo when we go in the summer and have, up until the other night, managed to miss the recently added African animal exhibit. I'm glad we finally made it in, it was great! (Despite the kids being scared of the giraffes). So, overall, with the light displays, the animals, the cafe (allowing us to have snacks indoors versus in the car or while walking through the cold), we decided this activity was worth pushing bedtime a little late.

Favorite holiday movie

White Christmas is the first holiday movie I watch each year. (I'm a little behind on seasonal videos and music this year-it took me all of November to get through this one and as far as music goes, we haven't progressed past John Denver with the Muppets. Yikes!) No one else in my family here would post this as their favorite, but my sister and I would gladly attempt performing any musical number (dance, included) or quoting any dialogue to prove our devotion to this classic, cheesy as it is. It's one of those movies you can make fun of (you know, wardrobe, hair, script, line delivery, plot and such) but still absolutely love. If you're bored, check out the script online. Must have been an early draft or those guys did a lot of cutting and ad-libbing.

Wednesday, December 5

Old School Ornaments

After having so many of our Christmas ornaments broken last year, we decided against them completely this year. Everything on the tree will be made by the kids (except our last few strings of working lights; time to buy-one-get-one-free at Walgreens!)
I love the idea of finding a fresh and unique project, but sometimes old school is the easiest and proves to be just as fun. So far, we've made paper chains (from 1" strips of multi-colored construction paper, varying the length of the strips to form small and large rings). We've made paper towel roll candles (about 4" of paper towel roll, with pieces of construction paper cut 4"x6.5" colored and glued around the outside of the roll and paper flames cut with an extension to glue inside the roll). And we've made 3-D stars like this.
Surprisingly, I really like the way our tree is turning out. We'll be making some more ornaments, but I haven't decided what we'll try next.